
Let’s Build A Keezer!

Okay, there I was minding my own business; happy with bottling my homebrew and never giving a thought to kegging. I then started experiencing a series of carbonation issues, with my bottles, that resulted in some low scores in 2022’s Star City Brewers Guild competitions. The first issue was over carbonation in an Amber Ale (this also was responsible for my first bottle bombs; with 2 blowing in the case). The next was under carbonation of an American Porter (this one had given me my lowest scores to date; 29/50 averaged between 3 judges). These issues made me want to have better control over my homebrew’s carbonation. Besides, if I go out, I want a draught beer, not a bottle. Why settle for bottles at home.
So, what’s a keezer? How is it different from a kegerator? Keezers use a freezer to cool kegged beer down without freezing it, while a kegerator uses a refrigerator to do the same. Your first decision is going to be how many faucets do you want? This will determine your freezer’s dimensions. I decided on a 4-faucet system: 3 running on CO2, with the 4th running on Beer Gas (75% Nitro to 25% CO2).
Next you need to decide how you want to build this system; traditional or Duotight. Traditional uses hoses with clamps, while Duotight has clampless hoses. I opted for the Duotight as it offered me more options than the traditional method.
Let’s look at the equipment I used. Just keep in mind, these were what I chose to go with. There are several options if you don’t like my choices. I just happen to be one of those people that likes to do things once and be done. So, I tend to use the best items in my budget range.
Chest Freezer- For a 4-faucet system you need a minimum of 7 cubic foot. Make sure you measure your dimensions before you commit, make sure it will accommodate all your kegs and gas cylinders.

Kegs- There are 2 types of kegs that are primarily used in Homebrewing Pin Lock and Ball Lock. Pin locks are shorter and wider, with pins on the posts to hold the disconnects on. While Ball lock are taller and narrower, with a quick disconnect to hold the beverage and gas lines to the posts. I chose the Ball Lock for the narrower profile. When available Southern Hills Homebrew Supply carries used kegs in both Pin Lock and Ball Lock. We also have new Torpedo Kegs. Just make sure you measure your freezer to make sure your choice fits. I would also highly recommend you replace the o-rings on your used kegs.
Ball Lock disconnects- You will need one liquid and one gas for each keg. I got an extra gas to use as a force carbonation connection (more on that later). Because I’m using Duotight I went with the MFL disconnects.
Faucets- I chose to use the Nukatap Forward Sealing Stainless Steel Faucet for cleanability of stainless steel and how the Nukatap seals when closed. It’s forward sealing means no air will get into the waiting beer to cause bad beer issues. Don’t forget the handles, faucet brush/plugs and shanks. If you do add Beer Gas to your system you will need a Stout Spout.
Duotight- I was going to list all the pieces I used but I don’t think it’s necessary. I will show pictures in the build section for you to get and idea on what you might need. For now, just visit this page to see your options.
Gas- A 5-pound CO2 and a 5-pound Beer Gas cylinder. Beer Gas will be your call. Southern Hills Homebrew Supply can get the Beer Gas, but you need to let us know so we can order you a tank. We also exchange the empty 5-pound tanks for full ones.
Regulator- You will need one regulator per tank. I went with the Dual Gauge CO2 Regulator with MFL and Check Valve. I also opted to add Duotight In-Line Regulators with Gauge to each of my kegs. Replacing the high pressure gauge with a low pressure gauge (we also have them in digital).
Tubing- You will need 6’ of Liquid line per keg and as much gas line to complete the system’s gas requirements. The 6’ of liquid line is to create enough resistance to keep foaming to a minimum. Duotight takes EVA Barrier Double Wall tubing.
Controlling the Keezer Temp- You will need something to control the freezer’s temperature, so your beer doesn’t freeze on you. We carry the InkBird Controller. You plug your keezer into the controller, place the probe into the interior and set the controller to the temperature you want.
Optional Items
Circulating Fan- I grabbed a Centrifugal Fan off of Amazon to keep the air moving so I don’t end up with cool air on the bottom and warm air on top.
Dehumidifier- I just grabbed a cannister of Damp Rid off Amazon. There are several different dehumidifiers that would work, just do a Google search.
Drip Tray- We’ll talk more in the building section on the installation of this. Just make sure your Drip Tray is wider than the over all span of your faucets.
Paint- I used a Primer and Blackboard Paint from Lowe’s.
Weather Stripping- The Foam Weather Stripping will help to insulate as well as keep your lid from sliding.
Liquid Nails and Caulk- Just an added precaution for insulation.
Sand Paper- I used 120 grit to rough up the freezer so the primer would adhere to it better.
Collar Material
If you’re feeling froggy you can drill into the lid of your freezer to attach your faucets, but most builds add a collar. The reason for the collar is to add additional space for your kegs as well as giving you a place to put your faucets. When I was doing my research for my Keezer, most builders were using 2x6 pine. I decided to use 2x4 pine instead. I just reasoned; why cool 2 inches you don’t have to. There is a “fatal flaw” in the 4 inches. The handles of your faucets will stick up above your Keezer. With the plugs in the ends of your faucets, the slightest tap on the handle will spray beer everywhere. Ask me how I know! Then to add insult to injury you have your wife asking you if you peed yourself as you storm upstairs to change. Whichever size you decide, you will need additional material to hang a couple of inches lower than your freezer’s lip. This will help to keep your lid from shifting when you use/open it. I had some 1x6 Deck boards I painted and used.
The Build
I’m going to write this just like I built it. If you decide not to paint your freezer, just skip ahead to the instructions that pertain to you.
- Remove the lid’s hinge assembly from both the freezer and lid being careful of the spring loaded hinge. Its bite isn’t as pleasant as you might think. It’s fairly straightforward, 5 or 6 screws. Remove stickers, logos and anything else that isn’t really needed.

- Clean and sand the outside surfaces in preparation for priming. I used the darkest primer I could get so I didn’t have to add a 100 coats of Blackboard paint. I used 2 coats of primer, allowing the first to dry before applying the second.


- Apply the Blackboard paint. I used a foam roller to apply 3 coats, allowing each coat to dry before applying the next coat. Notice the contrast between paint and primer.

- You can now build your inner collar. Cut your 2x4 (6?) to cover the same area that the lid sits on. I used liquid nails to help with insulation, some finishing nails to hold it together, and finished up with caulk (for additional insulation), then reinforced with corner brackets.


- If you elected to add weather stripping (I highly recommend you do), install it to the bottom of your inner collar. I had some issues with the glue that came with the weather stripping, so I used Liquid Nails and some clamps to hold the stripping in place until it dried; about 24 hours. (Sorry, it looks like I didn’t take a picture of this step). After it all dries you can set it on the freezer and reattach the lid (Watch those hinges, they bite!!! Ask me how I know.). Once you flush up the lid to the inner collar, use wood screws to attach the hinge to your collar.
- If you elected to add an outer collar, this is the time for it. At the risk of losing “Father of the Year” points, I’m going to throw my youngest, who lives in Florida, under the bus (Sorry, Son!). He came up for a visit at Thanksgiving, for a Turkey Throwdown (I grilled mine, he deep fried his. Both turned out excellent! I injected mine; he brined his. I spent 3-ish hours at the grill; he spent 30 minutes at the fryer {I had more time to drink Homebrew}.). What does this have to do with my outer collar? He has some Black Walnut he offered up for the outer collar but left it in Florida. I had some 1x6 deck boards so used them to make a temporary outer collar. There is one thing I have learned in my 59 years; there isn’t anything more permanent than something temporary. That being said, the wife had some brown spray paint so I gave the deck boards a couple of coats.

- I added my temperature controller, in this step. Where you hook it, is up to you. I wanted to see it without having to jump through a hoop, so I added it to the front. I ran the copper probe line under the inner collar, so I didn’t have to drill a large hole for the probe to fit through.

- Run your gas lines. Since I used Duotight, running the lines took less time than writing this blog. Just make sure you measure for the ½ inch that needs to be placed into the female end of the Duotight.

The line running to the right, in the above picture, is used for force carbonating. I left the high pressure gauge in the regulator to allow for the line to be used for 35-40 psi.

The gauges in the regulator, in the above picture, were changed to the low pressure ones so I can fine tune my pressure to my beer’s style. For instance, my Ordinary Bitter is pressurized to 6 psi. Whereas an American Porter will be at 12 psi.

I just continued to “daisy chain” the gas line through tees to the regulators for the remaining two. Changing out the high pressure gauges for low pressure. Pay attention to the flow direction on your regulator. Look for the arrow and orientate your low pressure gauges according to flow. I replaced mine in the same orientation as it was for the high pressure only to find out it was backwards for the way my gas is fed. I guess they do things differently in Australia.

- Tie your gas lines from your regulator to the quick disconnect MFL using a 8mm x ¼” flare connector. Keeping in mind that the gray disconnect is for the gas. You don’t have to worry about how long the gas line is, just make sure that you give yourself some leeway for where the keg will sit.
I also added check valves to my gas lines to prevent an accidental back feed. It’s not necessary but it keeps my O.C.D. happy.

- Determine where you want your faucets and allow for 4 inches on center for your holes. I pre-drilled pilot holes then used a 7/8 inch wood bit to run my shanks Attach your faucets, and your beer feed using a 8mm x Female beer thread to your shank. I used one of these tools to tighten my faucets to my shanks. It has a notched edge to allow for placing in the holes of a faucet to help tighten. It also has a place to help remove the EVA line from Duotight connections. I also ran some caulk under the shanks retaining nut to help with insulation. Attach your faucet handles.


- Attach 6 feet of EVA Barrier tube to each of your Duotight fittings to the black quick disconnect using your 8mm x ¼” flare Length is important here; using 6 foot of line will insure you have enough resistance that you don’t end up pouring a bunch of foam.
- If you opted to add the circulation fan add it to a spot that will be away from your kegs. I attach bar magnets to mine and stuck it to the side wall. I drilled a small hole to accommodate my fan controller and caulked for insulation.


- Place your drip pan so you catch the drips and overflow from your faucets. I used the bar magnets and Liquid Glued them to my drip pan. It didn’t work as planned. The stainless steel pan is too heavy for the magnets and will not stay in place if you place a beer on the pan to allow settling. What I should have done was make a wooden bib to extend down from my faucets. As of the writing of this blog it is unresolved. In all likely hood I will Liquid Glue another piece of painted deck board to the keezer and use screws to hold the drip pan in place. Let me know how you attached yours. DO NOT SCREW YOUR DRIP PAN TO YOUR KEEZER’S OUTSIDE WALL!! There are coolant lines running through here and if you puncture one, the keezer is dead.
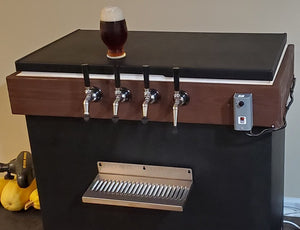
It’s finished!


The beer on the keezer is the very first pour out of my very first kegged beer. As you can see, I don’t think I will have to worry about under/over carbonated beer again. The beer is a house recipe here at Southern Hills Homebrew Supply, Asa’s Irish Red. We have it in All Grain and Extract.
Update
I finally figured out how to attach a bib to the Keezer that will hold the drip tray. I purchased corner brackets and some braces from Lowe’s attached them to a couple of the same style deck board that I used for the outer collar after painting the boards and the hardware. I then leveled and attached the drip tray.

Cleaning and Sanitizing
Before you use your Keezer, for the first time, you need to clean and sanitize the beer lines. We have a couple of options at the shop; a Beer Line Cleaning Kit, Hand Pump Pressurized Beer Line Cleaner. We also carry L.L.C., and BLC for cleaning the lines. You could also use your keezer’s CO2 tank and a spare keg to push cleaner or sanitizer through your lines. I opted for a modified version of this method, I had a ¼ inch ball valve at the house, and I attached a fitting to be able to hook up my air compressor. On the other end I attached a gas quick disconnect. I managed to score a small keg and I can fill it full of cleaner or sanitizer, attach my beer line to the “out” post and my compressors gas line to the “in” post. I can then run solution through my beer lines and out my faucets.


For cleaning the kegs, I use a Bucket Blaster setup. I just get 2 of my 5 gallon buckets, put cleaner in one, sanitizer in the other. I flush the tanks with PBW for at least 30 minutes, then Star San for at least 30 seconds and I’m done.
Filling a keg is only moderately different from filling a bottle. Hook your keg to your CO2 line and purge the O2 out of the keg for about 30 seconds (if the keg isn’t tuned upside down the CO2 will stay in the keg. It’s heavier than air). I still rack from my fermenter to my bottling bucket, then run a line from the bottling bucket’s spigot to the bottom of my keg. Fill the keg and replace the lid, it’s now ready for carbonating.
There are several ways to carbonate your beer, I use force carbonating. A search of the internet will produce a variety of methods, but this way works just fine for me. Since I have a spare gas line dedicated to force carbonating, I just connect this to the keg that was placed in the keeezer. I have the pressure set at 35 psi, I leave it attached for about 24 hours. I then remove the high pressure line, as well as, burp the tank by opening the pressure relief valve on the lid. Next I hook up my gas line with my dispensing pressure and leave for another 24 hours. After the 24 hours, I remove the gas line, re-burp the tank, reattach the gas line and dispense my beer.
Here is a link to the rest of my blogs, if you haven’t read them yet. As always, leave a comment or question so I know it’s being read.
I’d also like to thank my son, Jetmir, for helping with the collar build! It definitely wasn’t a one-man job!
- John Thompson
Comments 0